

My Circut Design Space Tools Bars Turned Small
Hello Daydreamers!
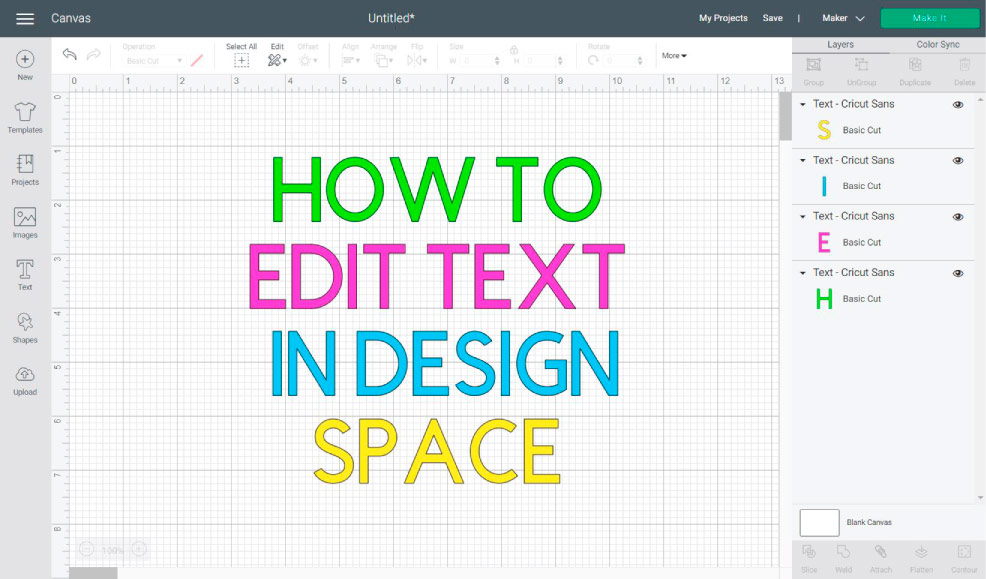
Get ready, because you will master how to edit text in Cricut Design Space like a PRO by the end of this article! I want to teach and empower you with the knowledge to come up with cool ideas on your own!
Text is a huge deal in any design. You can accomplish so much with it, and that's why you need to get hands-on and learn all the possibilities you have with the Cricut Machine.
Learning the basics and more advanced options that are available within the Cricut Design Space area will allow you to personalize things and do them beautifully!
This tutorial is quite juicy, and since I don't want you to get lost, these are the topics I will be covering.
- How to add text
- Editing text Menu (operation, curve, offset, font, kerning, change spacing, advanced settings, etc.)
- Using the "Attach" tool with text in Design Space
- Thinking outside the box when editing text.
Tip: This tutorial builds upon the skills I teach in every step, so if you're just getting started with your machine, I suggest you read/follow each step.
Feel free to check out other links in this article, if you want to learn more about a certain topic.
Are you ready?
Let's go ahead and get started!
Note: This article has been updated, therefore some pics may look different if you're coming from IG, or Pinterest.
How to Add Text in Design Space
First things first!
To add text to the design area, you need to click on the T (text) icon located on the left panel of the canvas. After clicking, a little box will appear, and this is where you would type your text.
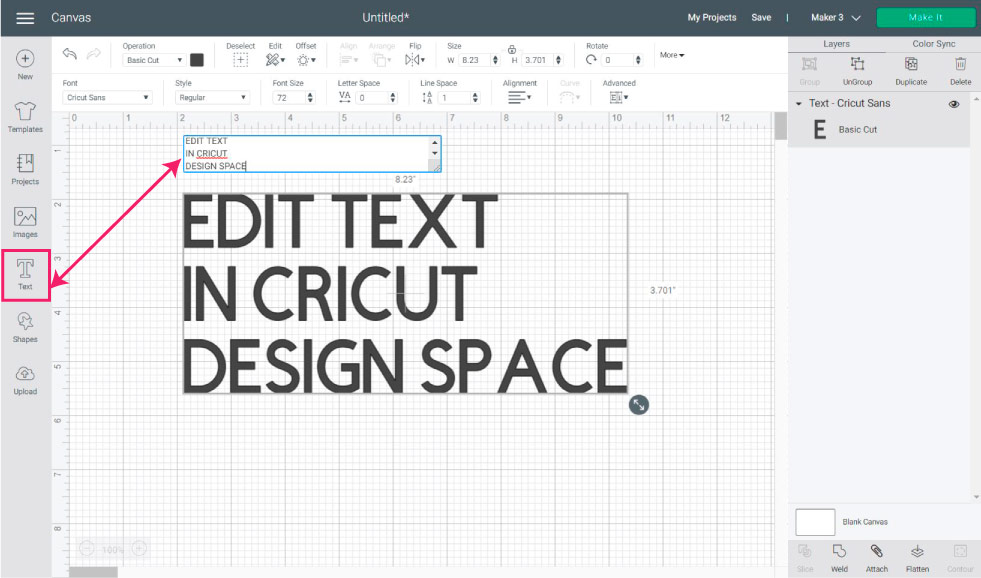
If you already typed some text, you can easily edit it by double clicking the text itself in the canvas area.
When you add text to Design Space and select it, you'll activate certain features or settings that otherwise would be greyed out.
Check out the following screenshot and let's see what I will covering in this section.

- Operation
- Offset
- Font
- Font Style
- Size, Letter, and Line Space
- Alignment
- Curve
- Advanced
Using Operation with Text in Cricut Space
Operation is how you tell your Cricut what action you want it to perform; depending on the machine you have, you'll have different operations.
Here's a useful table with all the machines available and the operations you can perform.
| Operation | Machine | Maker Machines | Explore Machines | Cricut Joy |
| Basic Cut | x | x | x |
| Wavy | x | ||
| Perforate | x | ||
| Pen | x | x | x |
| Foil* | x | x | x |
| Score | x | x | |
| Deboss | x | ||
| Engrave | x | ||
| Print then Cut | x | x |
*Foil has fine, medium, and bold tips with Maker and Explore machines. However, with the Cricut Joy, there's only one standard foil tip.
Let's see from a Cricut Maker machine perspective how every operation looks when using text in Cricut Design Space and let's have a little chat.
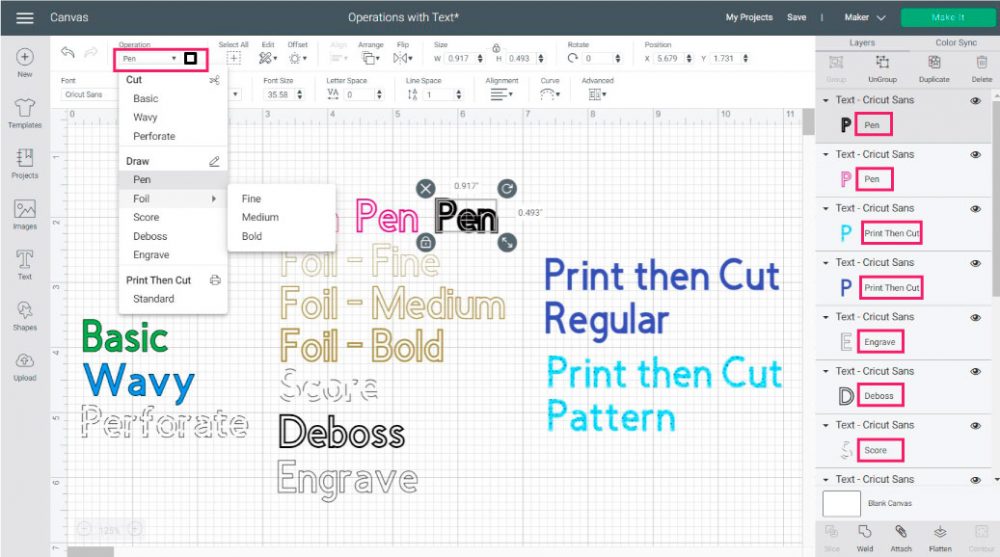
From the "Operation" drop-down menu, not only can you tell your machine what action you want it to perform, but you can also choose the different colors for the materials you want to use.
Next to "Operation," there's a little box. From this box, you can change the colors of certain operations (Basic, Wavy, Pen, Foil, & Print then Cut).
With the exemption to "Basic" and "Wavy," all operations have a very distinctive appearance on the canvas area. And some operations like Foil and Pen allow you to see how your text would look on your project when using different sizes of pens or tips.
Print then Cut allows you to use patterns as well.
Lear how to use Print then Cut with Cricut.
On the Layers Panel you can also see what operation every layer is set at as well.
Offset Text in Cricut Design Space
I love adding borders, or outlines to my projects!
If you like the look of the following screenshot you will love using the offset tool with your text in Cricut Design Space.
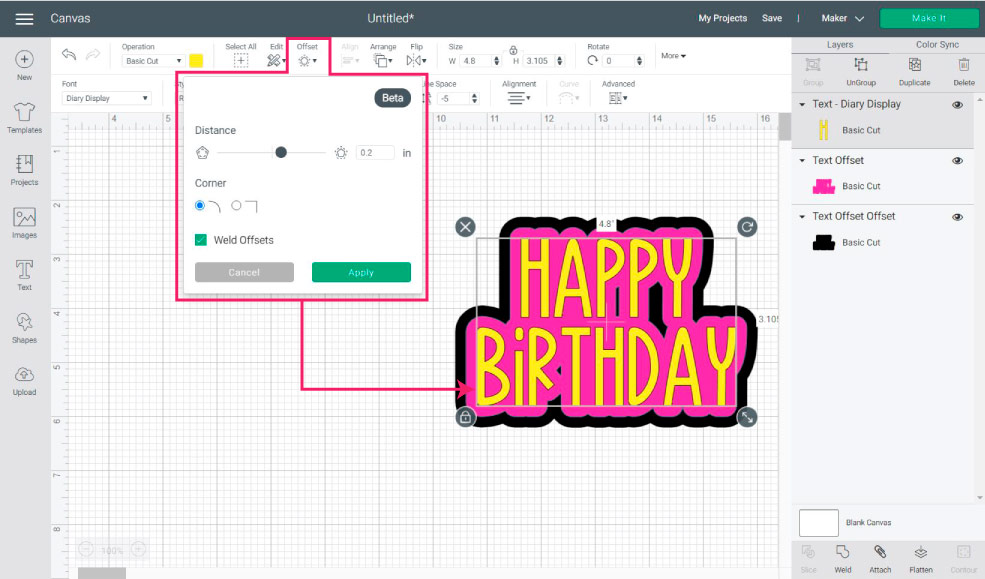
To add a proportional outline to your text, type it, then click on "Offset" and move the little slider to the right. You can choose between rounded and square cornerns.
If you want your offset to be a single layer, check "Weld Offsets," but if you don't, just leave it unchecked.
There's a lot of things you can do with this little tool. Check out how to use offset to perfection in Cricut Design Space.
Font Type
Every time you type something, Cricut Sans will be the default font. If you want to change the font, click on the Fonts drop-down menu and choose your favorite font.
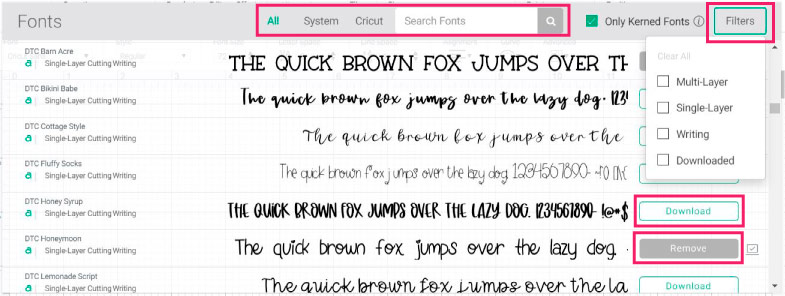
Keep in mind that not all fonts are free. If you have Cricut Access , you can use most of them. However, some of them need to be purchased prior to cutting your project.
If you don't know what Cricut Access is, make sure to read this great guide I put together.
If you want to stick to free fonts, make sure to filter by "My Fonts" (This will include your system fonts and some Cricut Fonts that Cricut may have free at the moment.
Something really cool about Cricut Fonts is the writing and Multi-layer Fonts.
Writing fonts are great for Cricut Pens and the Foil transfer kit because they will give a hand-drawn effect to your projects. Multi-layer fonts are a type font that consists of 2 or more layers.
Using Kerning in Cricut Design Space
In the past, if you wanted to use a cursive font in Design Space, you had to do a lot of steps to fix it because the letters weren't joined.
To have joined cursive letters, you must check "Only Kerned Fonts," in the "Font" drop-down menu.
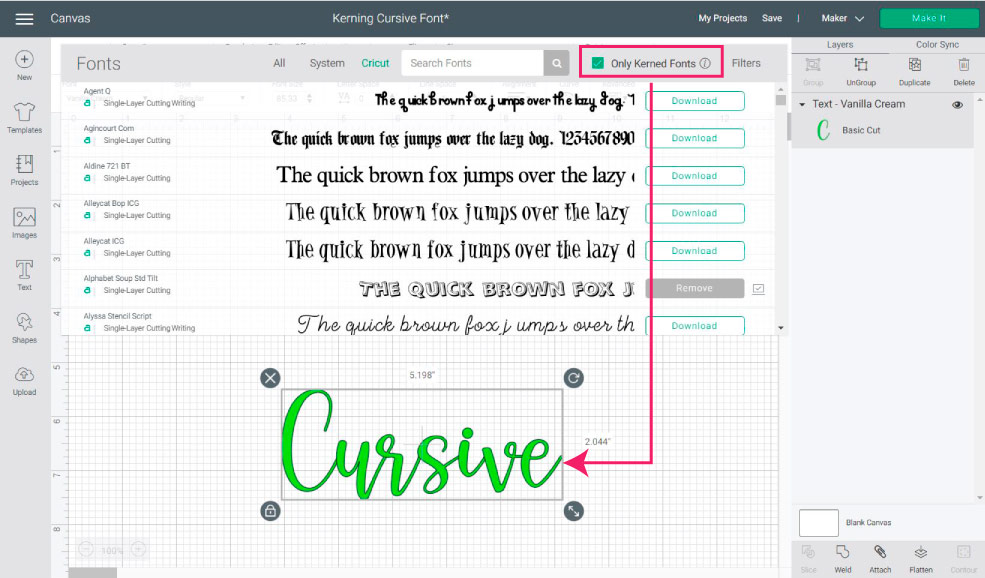
Kerned fonts will look "welded" when you send your project to cut, so there's no need for you to "Weld" them on the canvas area because you won't be able to edit your text.
From time to time you'll find a font that won't work very well with kerning in Design Space. If that's the case, let me show you how to fix it.
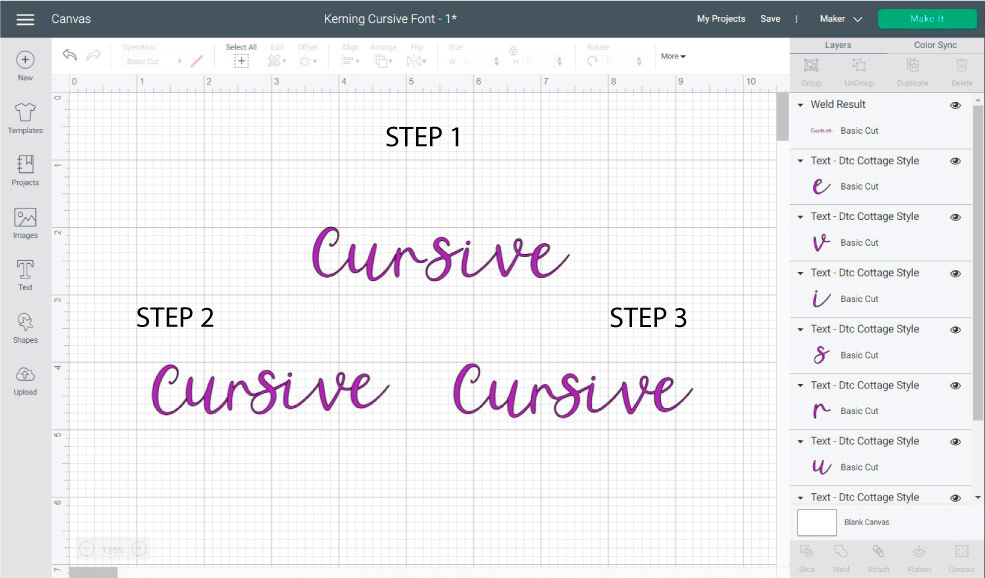
Step 1: Write your design text, click on "Advanced," and then select ungroup to letters so you can manipulate each one letter.
Step 2: Connect the letters that need it.
Step 3: If you were going to cut your project right now, all letters would be cut out individually. To make this a single word, select all letters and click on the "Weld" tool located at the bottom of the right panel of the canvas area.
Font Style
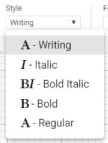
When you click on font style, you will be given a drop-down menu. The most common options are Regular, Bold, Italic, and Bold Italic.
However, if you are using Cricut Fonts you may have more or less options like "Writing."
The Big Difference between Cricut Fonts and System Fonts
There's a big difference between the Cricut and System fonts. The Cricut Fonts are designed to fit all of the potentials of your machine.
You have the Writing – as a font style – and the Multi-Layer options.
Sure, you can write with your system fonts – by changing the operation from cut to "pen," but it would look more like an outline of the font rather than a handwritten effect.
Learn how to use Cricut Pens.
If you are like me and like "free", you can get away with free fonts if you know what to look for. I teach this on my "Best free and premium fonts to use with Cricut" article.
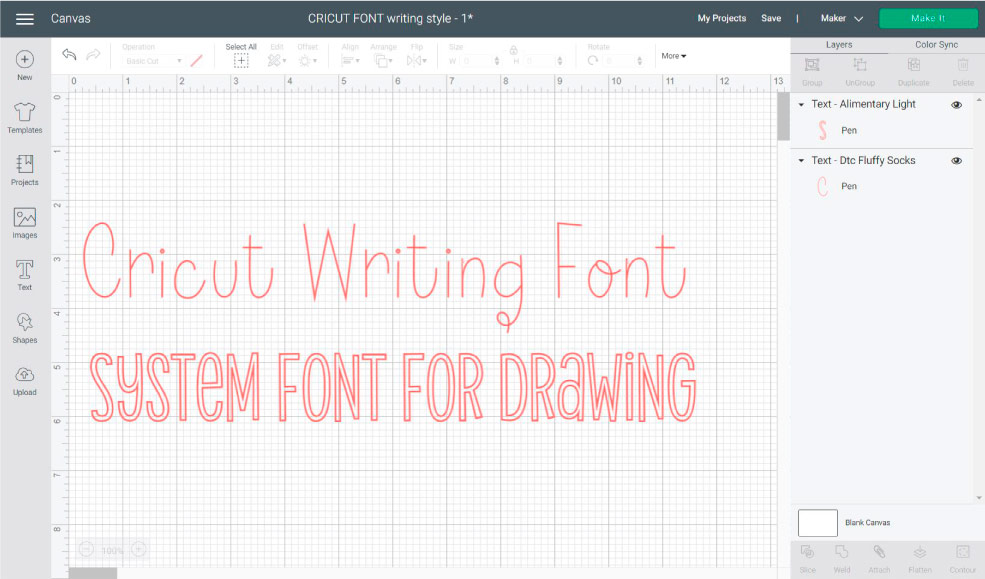
Font Size and Letter Spacing

As the name says, the font size will allow you to change the size of your selected text.
Letter Space is really cool because you can adjust the space between letters.
Line Space is extremely cool as well, but this time you can either increase or decrease the length of text lines.
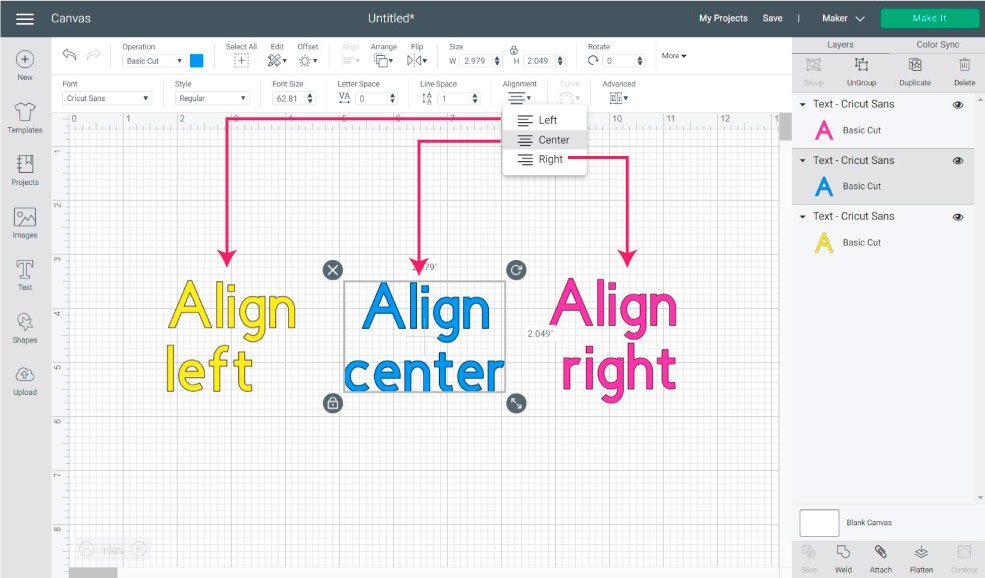
Text Alignment
This option will allow you to align paragraphs in three different ways:
- Left: Selected text will be aligned to the left
- Center: Selected text will be centered
- Right: Selected text will be aligned to the right
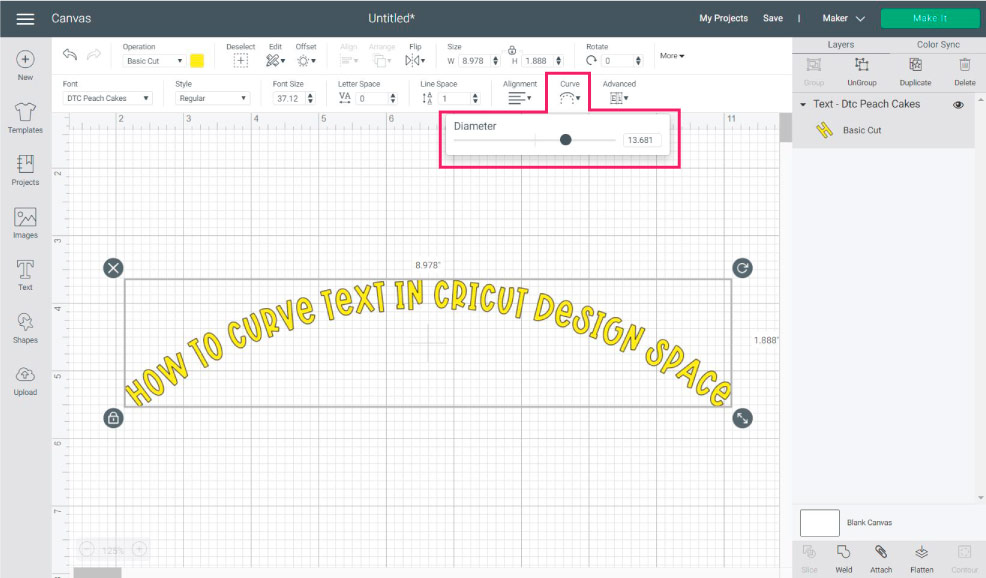
Curve Text
I love this feature! Curving text can add an extra touch to any design. However, this option is only available for one line of text at a time; no paragraphs!
Tip: Ensure that when you write your line of text, you don't have the cursor on the second line of the text bock because it will keep the "Curve" tool greyed out.
Select your text line and play with the curve option. The further you are from the center the more curved appearance you will add to your text.
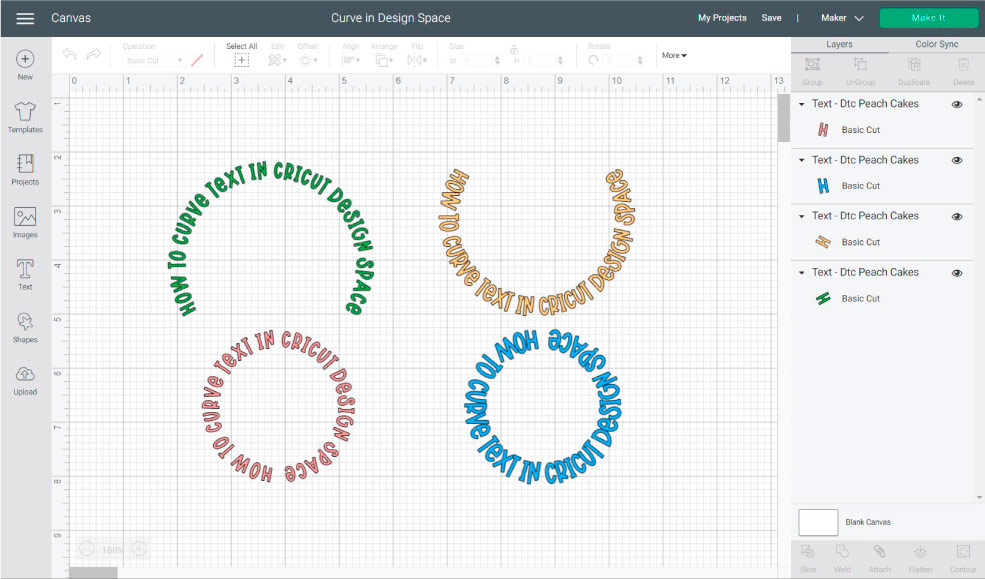
Here are some examples of the same line of text while curving positive and negative.
Advanced Options
This is by far one of my favorite options and you may think is difficult because of the name of this icon!
For this example, I am using a Multi-Layer font called A Frightful Affair. This font is made out of two layers. An outer (black) and inner (purple) one. Each layer may represent a different material color when cutting your project.
Using this font, let's see how each of one the "Advanced" options work.
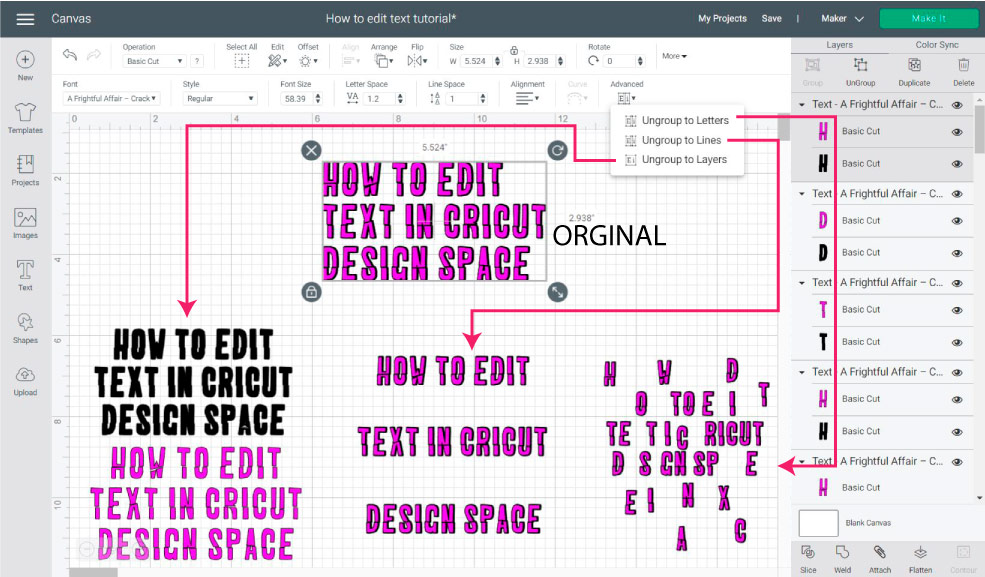
Ungroup to layers: This option is only available on multi-layers fonts. When you click on this setting, you can separate all of the layers that make up the font and edit them individually. This is great if you only want to use a particular layer of text.
Ungroup to lines: If you need to write a paragraph but need all text lines on their own, this tool will be your best friend.
Write your paragraph, align and space your fonts and then click on ungroup to lines. Then, you can edit each line of text on its own!
Ungroup to Letters: This option allows you to separate every letter into a different layer; it can be applied to a paragraph, line of text, or just any word.
Notice that when you separate to lines and letters, the font kept the multi-layer attribute. So, If you have a multi-layer font, you can ungroup to layers after using either ungroup to lines or letters.
Vertical Text in Cricut Design Space
Let's see the following image so you can have vertical text on your projects.

Step 1: Click on the text icon, then press "enter" on your keyboard after every single letter. For instance "V" enter "E" enter, and so on, until you complete your word.
Step 2: Select text on canvas, click on "Alignment" and select "center."
Step 3: You can adjust "Line Space" to make letters closer or more apart.
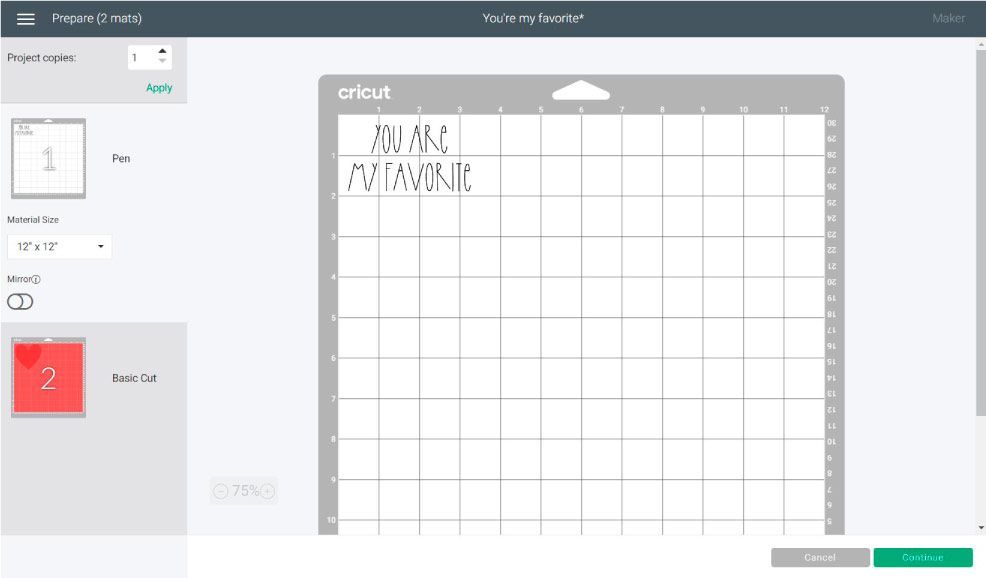
Using the Attach tool with Text in Cricut Design Space
Let's say you want to add text to a card using pens, foil, etc. You need to tell your machine where you want that text.
Attach joins the room!
In my opinion, "Attach" is the most important tool inside Cricut Design Space. Normally, this little setting is what causes THE MOST HEADACHES for beginners.
Let's see the following screenshot. It's a small heart shape with some text on top of it. To tell your machine you want your text there, select both layers and click on "Attach."

When you click on "Make it" everything will look just the it's supposed to!
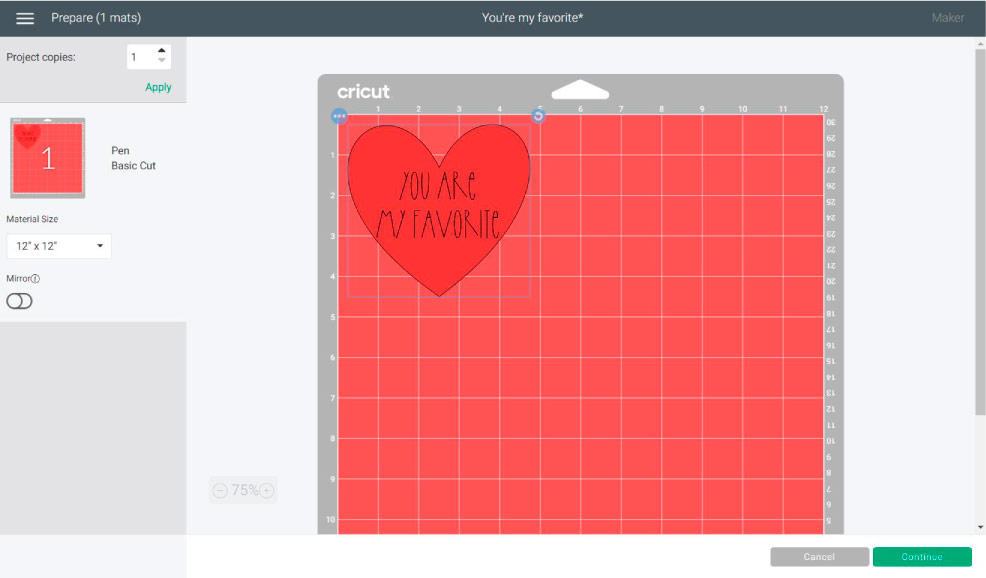
If you forget to attach, your text will be on a different mat, and it will drive you crazy!
If you're just learning your machine, check out my "Weld, Attach, and Group" tutorial.
Think Outside the Box when Editing Text in Design Space
I want to show you two cool examples of what you can accomplish when you learn how to edit text in Design Space and how to turn a boring looking design into a unique and creative one.
Making Text into a Heart in Design Space
How about using multiple words to make a heart in Cricut Design Space.
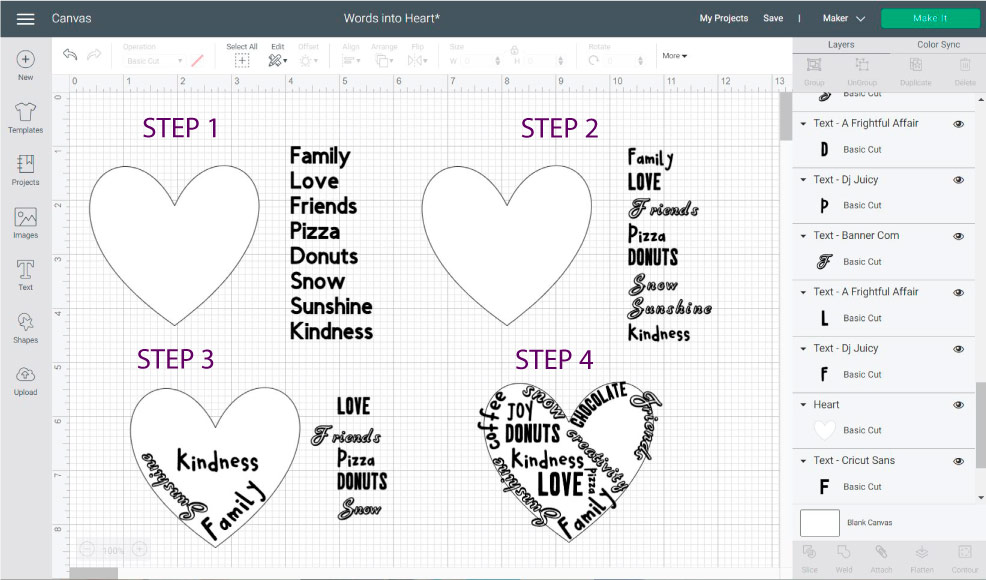
Step 1: Add a heart and text. Choose words that are meaningful to you, like the name of your little ones, the food you love, what you like to do, etc.
Step 2: Choose 3 fonts you like (less is more) and change the initial fonts. For this example, I used:
- A Frightful Affair
- DJ Juicy
- Banner Com
Step 3: It's time to fill your heart. Use the curve tool to fit some words around the edges. Then be creative and rotate in different directions to add life to your design.
Step 4: Continue adding text. If you still have space for more words, don't be afraid and add more. I added a couple of ones like chocolate, daydreams, joy, etc.
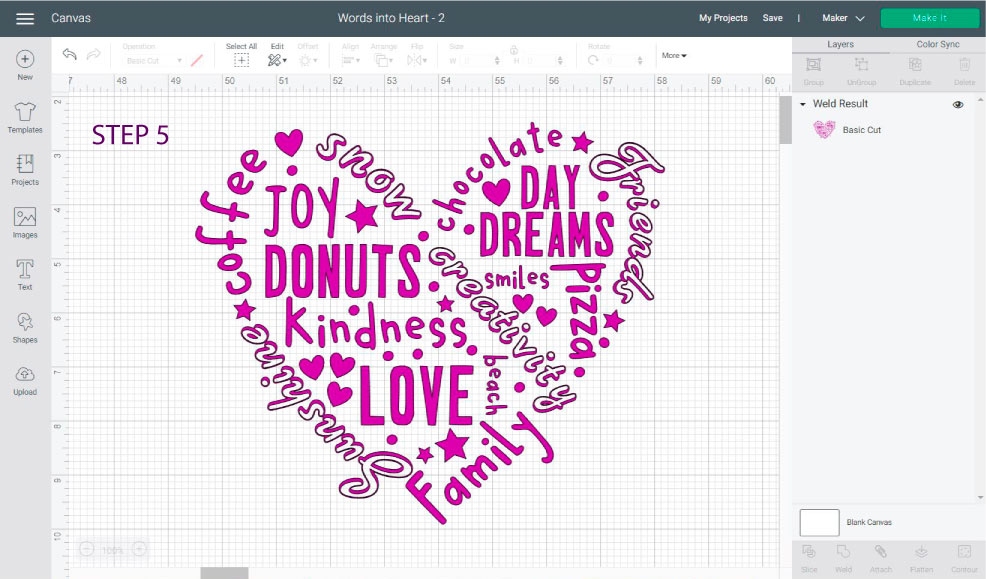
Step 5: If your heart has some spaces where you can't fill a word, just add shapes! Small circles, stars, and hearts. When your design is complete hide the heart and either weld (if you want a single layer) or attach.
Turn Plain text into a Beautiful quote
Sometimes we think we need to have excellent hand-lettering skills to have a fun design. I wish I had some of those, but let's just say I am not gifted in that area, lol. (One day, I gotta learn). So what are we going to do?
Well, work with what we have, fonts and shapes.
This is how we do it:
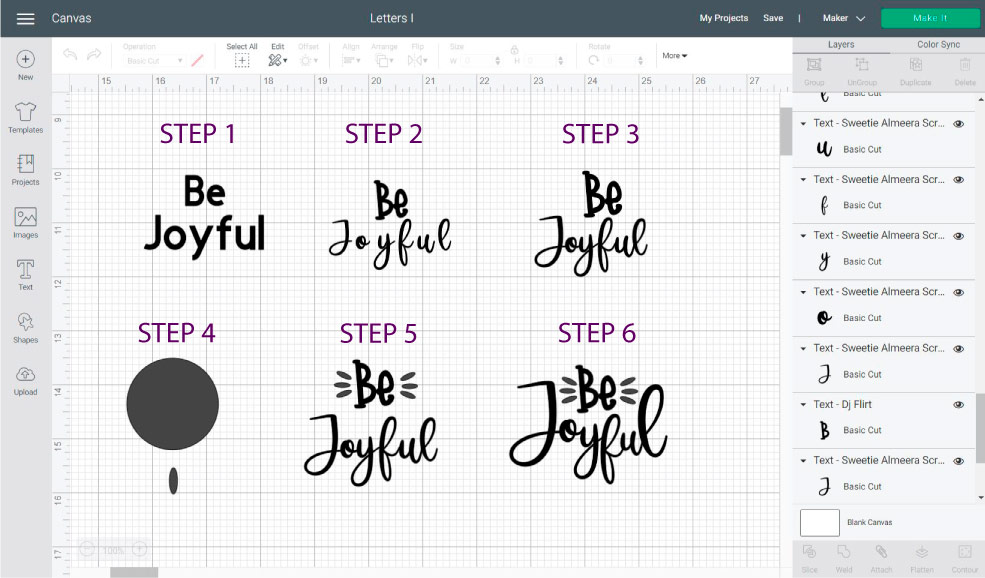
Step 1: Add two different lines of text. (Or one paragraph and ungroup to lines)
Step 2: Pick two fonts that look good together. Regularly, this is the hardest part. I took about 15 minutes trying to pair them. But you'll get better with time.
These fonts are:
- DJ Flirt for the "Be"
- Sweetie Almeera Script (You have to buy it, but it's BEAU-TI-FUL
If using a script font, uncheck "Kerning fonts only" as you learned in this tutorial.
Step 3: Organize cursive font by reducing letter spacing and then ungrouping to letters (click the text and go to the advanced options)
Step 4: Add a circle and unlock proportions to make a small oval.
Step 5: Duplicate and rotate oval to complete glyphs. I usually like to do the ones on the left and then I select and copy them and flip them horizontally.
Read my how-to mirror and flip tutorial.
Step 6: If you didn't ungroup to letters on step 3, now it's the time to do it. Modify each letter so it hugs the glyphs and the "be." Be creative!
Experiment. I had to double the size of the letters J and L and bring the other letters down.
Step 7: When you are happy with the result, select all of your designs and click on "Weld."
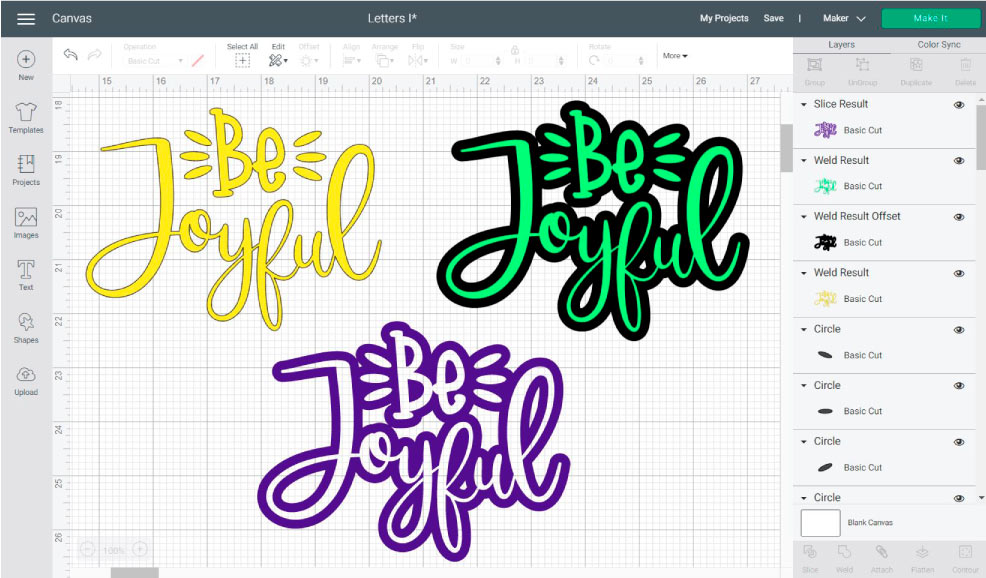
The yellow layer is how it looked, but you can edit the text even further!
What about adding an offset. So beautiful! And to edit, even more, go ahead and select both the original and the offset layers and "Slice" at the bottom of the layers panel.
You have something totally new.
You see!
It's not that hard, you just need to practice, practice, practice!
That's it! You are a Pro Now!
So…
What did you guys think? What kind of projects are you going to make now that you are a Pro at editing text in Cricut Design Space?
I can't wait to hear all about so make sure to comment on the section down below
Do you know that it takes me over 25 hours of work to complete a single Cricut article? I know, it's crazy! But I like to make sure that you understand EVERYTHING!
I would appreciate your support on Instagram / Pinterest / YouTube / as I am trying to grow my audience to keep producing great content!
My Circut Design Space Tools Bars Turned Small
Source: https://www.daydreamintoreality.com/edit-text-cricut-design-space/
Posted by: coomerablither.blogspot.com
0 Response to "My Circut Design Space Tools Bars Turned Small"
Post a Comment